Add route, controller and view for managing contacts
We want to render table and form for our addressbook.
In the previous tutorial we created a model for contacts but did not create a user interface to manage it. In this tutorial, we will learn how to add route, controller and view to manage our contacts.
IMPORTANT | To understand the basics of creating routes, controllers and views, check this previous tutorial.
Add new route
Add following line anywhere in the init() method of your app's Loader.php:
./apps/external/MyCompany/MyApp/Loader.php
<?php
namespace HubletoApp\External\MyCompany\MyApp;
class Loader extends \HubletoMain\Core\App {
  public function init(): void {
    ...
    $this->main->router->httpGet([ '/^my-app\/contacts\/?$/' => Controllers\Contacts::class ]);
    ...
  }
}
Create controller
Create following controller in ./apps/external/MyCompany/MyApp/Controllers/Contacts.php:
./apps/external/MyCompany/MyApp/Controllers/Contacts.php
<?php
namespace HubletoApp\External\MyCompany\MyApp\Controllers;
class Contacts extends \HubletoMain\Core\Controller {
  public function prepareView(): void {
    parent::prepareView();
    $this->setView('@HubletoApp:External:MyCompany:MyApp/Contacts.twig');
  }
}
Create view
Create following view in ./apps/external/MyCompany/MyApp/Views/Contacts.twig:
./apps/external/MyCompany/MyApp/Views/Contacts.twig**
<app-table string:model="HubletoApp/External/MyCompany/MyApp/Models/Contact"></app-table>NOTE Hubleto uses
<app-*HTML notation to insert React components into the browser's DOM.
Add a button in the dashboard
Last step is to publish your new addressbook. Modify Dashboard.twig file to look like this:
<div class="mt-2">
  <a class="btn btn-primary" href="my-app/contacts">
    <span class="icon"><i class="fas fa-user"></i></span>
    <span class="text">{{ translate("Contacts") }}</span>
  </a>
</div>
You addressbook is ready
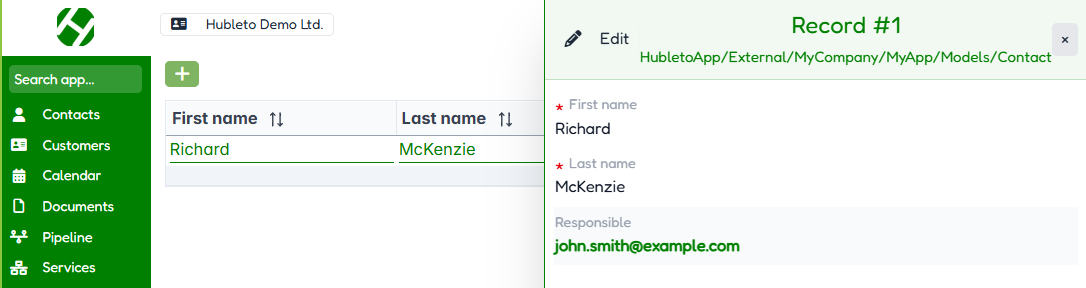
Now open Hubleto in your browser, go to your app and then click Contacts. Enjoy your new addressbook 😜. If you like Hubleto, help us improve it.
Download the source code
To check if you did everything correctly, you can download the full source code of this app.
Learn more
You become a Hubleto developer. Keep going with your apps and enjoy Hubleto.
There is much more to learn. We recommend you to continue with this tutorial and learn how to create more complex models. You can also start reading advanced development guide.