Add route, controller and view
An app is a basic functional element of Hubleto. Every functionality available in Hubleto is thus built using apps.
In the previous tutorial we have created and installed an empty app.
Now we will learn how to add first simple functionality - one controller and one view.
Introduction
Hubleto follows the Model-View-Controller (MVC) architecture. This means that to create any user interface, you must create views. These views will be initiated in controllers. And, finally, these controllers will be initiated by accessing some URL and applying a routing.
For example, we want to show current date and time on the following URL:
To get this, we need to:
- Configure a route for the
my-appURL. This route should activate the controller. - Create a controller which will be activated by the router. This controller will prepare some variables (current date and time) for the view.
- Create a view that will display these variables.
Let's learn step by step.
Add route
TIP | If your are experienced developer, you know about MVC and you can easily read PHP code directly, you may download the full source code of MyApp.
Each app is initialized during the Hubleto bootstrap. The initialization is done by executing init() method of each app in the order in which they have been registered.
To create a routing table for HTTP GET requests, use httpGet() method of the main router which is available in $this->main->router property. The method takes an array of routes as an argument and adds these routes to the router's routing table.
REMEMBER
$this->mainis the secret word for accessing the Hubleto main core. It contains project config, router, permission manager and other useful components.
Each route is a very simple key/value pair where key is a regular expression to match relative URL (in our case the my-app part of the URL) against and the value is the reference to the controller to be executed.
An example of a simple routing table is shown below. This routing adds a my-app URL which will activate the Dashboard controller.
./apps/custom/MyApp/Loader.php
<?php
namespace HubletoApp\Custom\MyApp;
class Loader extends \HubletoMain\Core\App {
  public function init(): void {
    parent::init();
    $this->main->router->httpGet([ '/^my-app\/?$/' => Controllers\Dashboard::class ]);
  }
}
Do not forget to call also parent::init().
TIP | To learn how router works, check this script and this script.
Add controller
Now we need to add a controller Dashboard which will be activated by the my-app URL.
To add this controller, create ./apps/custom/MyApp/Controllers/Dashboard.php file with the following content:
./apps/custom/MyApp/Controllers/Dashboard.php
<?php
namespace HubletoApp\Custom\MyApp\Controllers;
class Dashboard extends \HubletoMain\Core\Controller {
  public function prepareView(): void {
    parent::prepareView();
    $this->viewParams['now'] = date('Y-m-d H:i:s');
    $this->setView('@HubletoApp:External:MyCompany:MyApp/Dashboard.twig');
  }
}
This controller will prepare a variable now, stored in the controller's property viewParams and sets the view to be rendered to @HubletoApp:External:MyCompany:MyApp/Dashboard.twig. All this is done in the prepareView() method.
Referencing views
Setting a view to be rendered is done by controller's setView() method which takes a reference to the view as an argument.
Our view is referenced by @HubletoApp:External:MyCompany:MyApp/Dashboard.twig.
First part of this reference (@HubletoApp:External:MyCompany:MyApp) contains a reference to the app where the view is available. Simply said, this reference is always the same as the app's namespace, just using colons (:) instead of slashes (\). This reference always points to the Views folder in your app.
Second part is the relative path of the file containing the view. In our case, it is Dashboard.twig.
Add view
Now, as we understand how the views are referenced we know that we need to create ./apps/custom/MyApp/Views/Dashboard.twig file with the following content:
./apps/custom/MyApp/Views/Dashboard.twig
Hello. Current date and time is <b>{{ viewParams.now }}</b>.VISUAL_CHECK | Now you should be able to navigate to
http://localhost/my-hubleto/my-appand see the content of Dashboard.twig.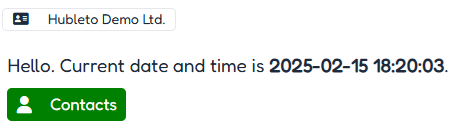
Well done! You are becoming a real Hubleto developer. In the next tutorial, we'll learn how to create a very simple addressbook.